Tensorflow – Training and evaluation on separate machines
Tensorflow is an open-source framework for high-performance numerical computation. It is used for both research and production systems on a variety of platforms from mobile and edge devices, to desktops and clusters of servers. Its main use is Machine Learning and especially Deep Learning.
In this post, we will show you how you can use your MooseFS cluster with Tensorflow to train deep neural networks!
Training and evaluation on separate machines
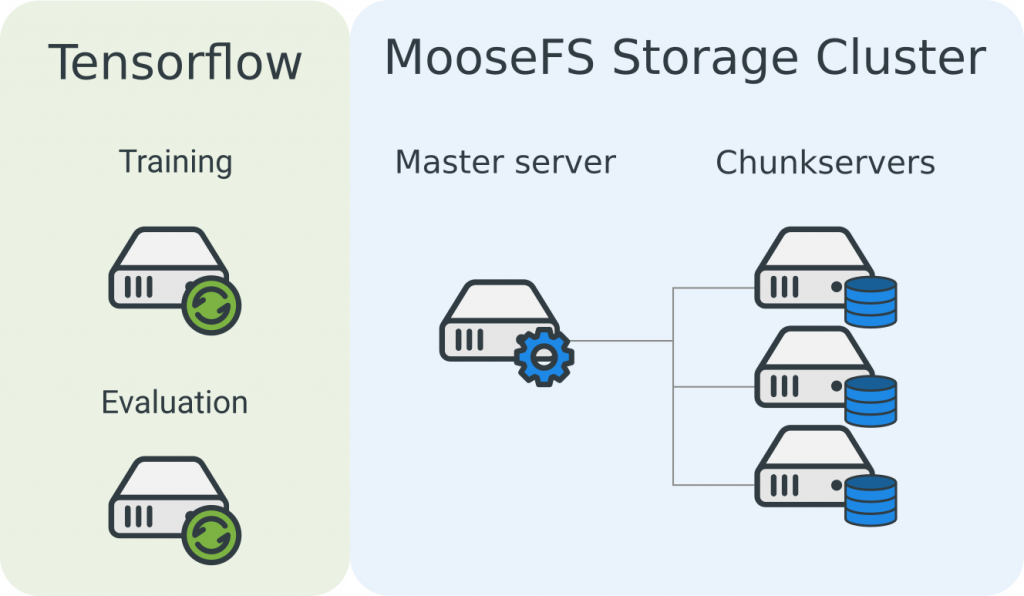
Imagine you have a machine with 1-4 GPUs and you want to use all of its for training but you still want to see the evaluation results. If you don’t want to run the evaluation job on CPU only, you can run the evaluation on other GPU enabled host. We will use a simple configuration where we have 3 servers with Tensorflow installed: model training, evaluation and Tensorboard graph visualization tool.
Hardware configuration
In this demo we are using three hosts with the following hardware/software:
- Training host
- GPU (optional, recommended)
- MooseFS Client (required)
- MooseFS Chunkserver (optional)
- Evaluation host
- GPU (optional, recommended)
- MooseFS Client (required)
- MooseFS Chunkserver (optional)
We assume training and evaluation hosts have one or more GPUs. It is recommended configuration since GPUs speed up deep neural networks training process many times. The third machine is used only for visualization of training/evaluation process. It runs tensorboard which is reading logs from a specified directory.
Of course, you can install Tensorflow on chunkservers or install MooseFS Chunkserver in your Tensorflow GPU-enabled host.
MooseFS test cluster in Google Cloud
For the purpose of this experiment, we will use the MooseFS cluster deployed on machines in Google Cloud. If you don’t have your cluster ready, go to this post How to quickly set up the MooseFS cluster in Google Cloud.
If you want to check the throughput of your network, go here.


Computation on separate nodes
In this case, we consider training Tensorflow models on separate machines. We assume operating systems are installed on new hosts, and hosts are in the same local network. Tensorflow machines have MooseFS Clients connected to the MooseFS Storage Cluster.
Installation
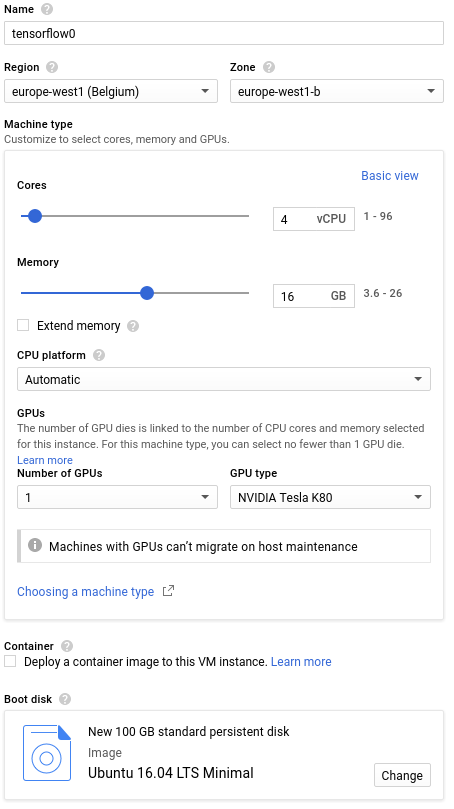
We will set up two identical machines for Tensorflow with 4 CPU cores, 16GB of RAM and one GPU – Tesla K80. Machines will be using standard 100GB hard drives. The configuration is presented on a screenshot below. We will create one and install Tensorflow and MooseFS and we will copy it afterward.
Machines with GPUs cost more! Check the pricing or go to the Pricing Calculator to estimate costs. You can’t create GPU enabled machines using free trial money, you will be charged.
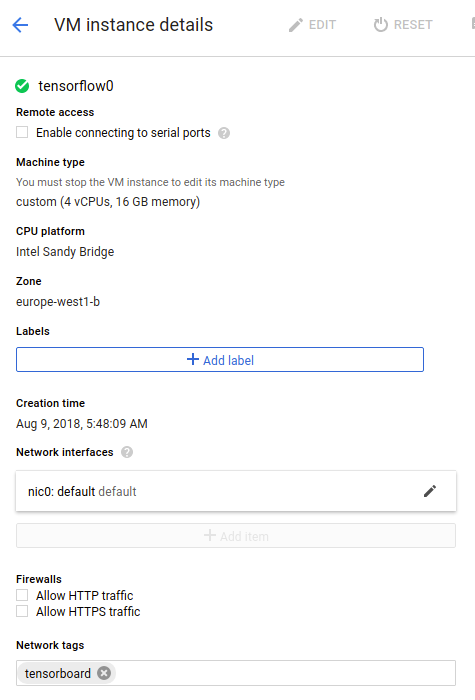
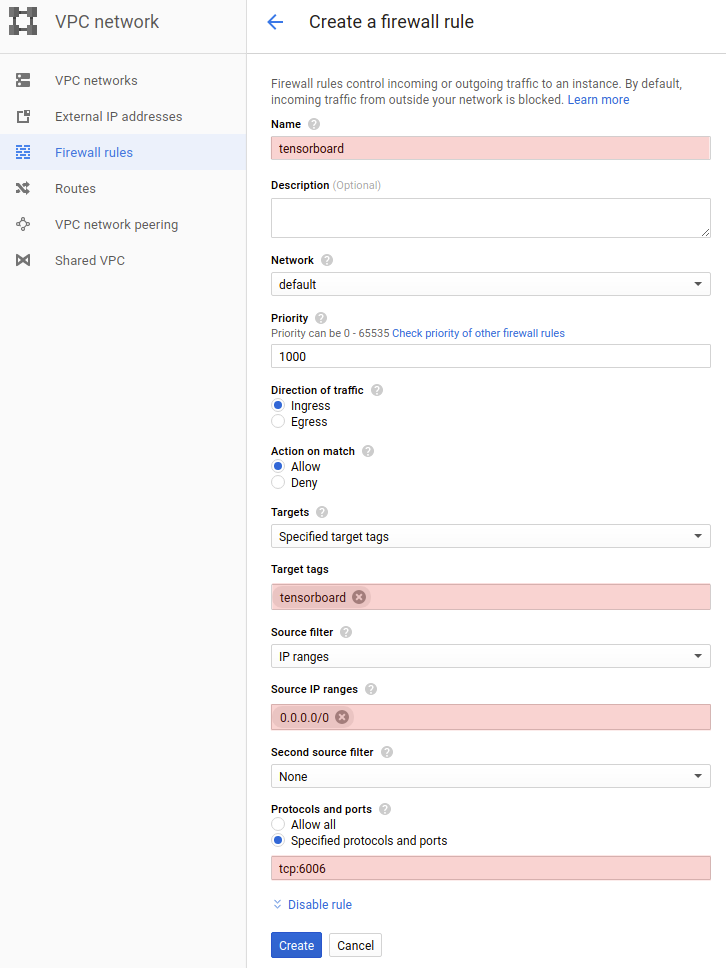
You need to add port 6006 to firewall rules for tensorflow0 to be able to see training progress in Tensorboard. We will add network tag tensorboard to the tensorflow0 machine. This can be done only when the machine is switched off.
We will create a firewall rule for label tensorboard
Install python
Let us install python3 and Tensorflow on Tensorflow0 machine. We will start by updating Ubuntu.
sudo apt update
sudo apt upgrade -y
Python 3.5.2 should be preinstalled already, so let us check the version of Python3 by typing:
python3 -V
Now we will install Python package manager PIP for python3
sudo apt install -y python-pip python3-pip
sudo pip2 install --upgrade pip
sudo pip3 install --upgrade pip
Install CUDA
Now we are ready to install Tensorflow. We want to install GPU enabled version of Tensorflow, so let us check the hardware installed. But first, we will need to install CUDA. CUDA 9.0 is our recommendation for Ubuntu 16.04 and Tensorflow 1.9.0.
We will use CUDA installation instructions from https://developer.nvidia.com/cuda-90-download-archive with a small modification – we will explicitly install 9.0, since there are newer versions.
wget http://developer.download.nvidia.com/compute/cuda/repos/ubuntu1604/x86_64/cuda-repo-ubuntu1604_9.0.176-1_amd64.deb
sudo dpkg -i cuda-repo-ubuntu1604_9.0.176-1_amd64.deb
sudo apt-key adv --fetch-keys http://developer.download.nvidia.com/compute/cuda/repos/ubuntu1604/x86_64/7fa2af80.pub
sudo apt-get update
sudo apt install cuda-9.0 -y
To complete installation reboot is required
sudo reboot
Now we can check Nvidia devices using the following command:
nvidia-smi
You should get a similar result as below.
+-----------------------------------------------------------------------------+
| NVIDIA-SMI 396.44                 Driver Version: 396.44                    |
|-------------------------------+----------------------+----------------------+
| GPU  Name        Persistence-M| Bus-Id        Disp.A | Volatile Uncorr. ECC |
| Fan  Temp  Perf  Pwr:Usage/Cap|         Memory-Usage | GPU-Util  Compute M. |
|===============================+======================+======================|
|   0  Tesla K80           Off  | 00000000:00:04.0 Off |                    0 |
| N/A   32C    P0    55W / 149W |     16MiB / 11441MiB |      0%      Default |
+-------------------------------+----------------------+----------------------+

+-----------------------------------------------------------------------------+
| Processes:                                                       GPU Memory |
|  GPU       PID   Type   Process name                             Usage      |
|=============================================================================|
|    0      1731      G   /usr/lib/xorg/Xorg                            14MiB |
+-----------------------------------------------------------------------------+
Install CUDNN
CUDNN is required for Tensorflow with GPU support.
Go to developer.nvidia.com/rdp/cudnn-archive and download latest CUDNN 7 for CUDA 9.0. You need to be registered to download it, registration is free of charge.
We recommend using general Linux package cuDNN v7.1.4 Library for Linux instead of packages prepared for Ubuntu.
After downloading the archive, we will copy it to our server using Google Cloud command line tool gcloud.
On your local machine:
gcloud compute scp ~/Downloads/cudnn-9.0-linux-x64-v7.1.tgz tensorflow0:
Back to tensorflow0. We will unpack the archive.
tar xvzf cudnn-9.0-linux-x64-v7.1.tgz
cd cuda
sudo cp -P include/cudnn.h /usr/include
sudo cp -P lib64/libcudnn* /usr/lib/x86_64-linux-gnu/
sudo chmod a+r /usr/lib/x86_64-linux-gnu/libcudnn*
Install Tensorflow
You can install Tensorflow using just one command thanks to Pip.
sudo pip2 install tensorflow-gpu==1.10.0
sudo pip3 install tensorflow-gpu==1.10.0
And now everything should be ready to run Tensorflow code. We can quickly check available devices for Tensorflow using:
python2 -c "from tensorflow.python.client import device_lib; print(device_lib.list_local_devices())" 2>/dev/null
python3 -c "from tensorflow.python.client import device_lib; print(device_lib.list_local_devices())" 2>/dev/null
Sample result shows that we can run on CPU and Tesla K80 GPU:
[name: "/device:CPU:0"
device_type: "CPU"
memory_limit: 268435456
locality {
}
incarnation: 7924687012402941002
, name: "/device:GPU:0"
device_type: "GPU"
memory_limit: 11266549351
locality {
bus_id: 1
links {
}python2 -c "from tensorflow.python.client import device_lib; print(device_lib.list_local_devices())" 2>/dev/null
python3 -c "from tensorflow.python.client import device_lib; print(device_lib.list_local_devices())" 2>/dev/null
}
incarnation: 8645147392941575694
physical_device_desc: "device: 0, name: Tesla K80, pci bus id: 0000:00:04.0, compute capability: 3.7"
]
Install MooseFS Client
Log in as the superuser:
sudo su
Add repository:
wget -O - https://ppa.moosefs.com/moosefs.key | apt-key add -
Add an appropriate repository entry in /etc/apt/sources.list.d/moosefs.list:
echo "deb http://ppa.moosefs.com/moosefs-3/apt/ubuntu/xenial xenial main" > /etc/apt/sources.list.d/moosefs.list
And run:
apt update
You can install MooseFS Client using the following command:
apt install moosefs-client
Now we will mount MooseFS to /mnt/moosefs
mkdir -p /mnt/moosefs
mfsmount /mnt/moosefs
That’s it! MooseFS is now mounted in /mnt/moosefs. We should see mount in CGI (mfsmaster:9425)

Download Tensorflow and Tensorflow/models repositories
We will download Tensorflow and Tensorflow models repositories from Github.
cd ~
sudo apt install git -y
git clone https://github.com/tensorflow/tensorflow.git
cd tensorflow
git clone https://github.com/tensorflow/models.git
Install Bazel
Install requirements
sudo apt-get install pkg-config zip g++ zlib1g-dev unzip python zip openjdk-9-jdk-headless openjdk-9-jre-headless zlib1g-dev -y
Download Bazel from Github https://github.com/bazelbuild/bazel/releases. Choose the latest bazel_X.YY.Z-installer-linux-x86_64.sh package.
wget https://github.com/bazelbuild/bazel/releases/download/0.16.0/bazel-0.16.0-installer-linux-x86_64.sh
chmod +x bazel-0.16.0-installer-linux-x86_64.sh
./bazel-0.16.0-installer-linux-x86_64.sh --user
Fine tuning Inception v3 in TensorFlow
Download flowers dataset
Now we will download flowers dataset and got through inception v3 tutorial.
# location of where to place the flowers data
FLOWERS_DATA_DIR=/mnt/moosefs/flowers-data

# build the preprocessing script.
cd ~/tensorflow/models/research/inception
bazel build //inception:download_and_preprocess_flowers
sudo pip2 install numpy
bazel-bin/inception/download_and_preprocess_flowers "${FLOWERS_DATA_DIR}"
It should finish with similar last line:
2018-08-09 09:56:40.812567: Finished writing all 3170 images in data set.
Let’s see what is inside of the directory
ls -lah ${FLOWERS_DATA_DIR}Which results:
total 447M
drwxrwxr-x 3 karolmajek karolmajek 2.0M Aug 9 09:56 .
drwxrwxrwx 3 root       root       2.0M Aug 9 09:49 ..
-rw-rw-r-- 1 karolmajek karolmajek 219M Aug 9 09:49 flower_photos.tgz
drwxrwxr-x 4 karolmajek karolmajek 2.0M Aug 9 09:56 raw-data
-rw-rw-r-- 1 karolmajek karolmajek 97M  Aug 9 09:56 train-00000-of-00002
-rw-rw-r-- 1 karolmajek karolmajek 96M  Aug 9 09:56 train-00001-of-00002
-rw-rw-r-- 1 karolmajek karolmajek 16M  Aug 9 09:56 validation-00000-of-00002
-rw-rw-r-- 1 karolmajek karolmajek 16M  Aug 9 09:56 validation-00001-of-00002
Now we will download a pretrained Inception v3 model:
INCEPTION_MODEL_DIR=/mnt/moosefs/inception-v3-model
mkdir -p ${INCEPTION_MODEL_DIR}
cd ${INCEPTION_MODEL_DIR}

# download the Inception v3 model
curl -O http://download.tensorflow.org/models/image/imagenet/inception-v3-2016-03-01.tar.gz
tar xzf inception-v3-2016-03-01.tar.gz
This will create a directory called inception-v3 which contains the following files.
ls inception-v3
# README.txt checkpoint model.ckpt-157585
Now we will start training on flowers dataset
# Build the model. Note that we need to make sure the TensorFlow is ready to
# use before this as this command will not build TensorFlow.
cd ~/tensorflow/models/research/inception
bazel build //inception:flowers_train
bazel build //inception:flowers_eval
We will run everything in a screen because training takes a long time
sudo apt install screen -y
Let us start fine-tuning the model!
screen -S flowers_train

cd ~/tensorflow/models/research/inception
FLOWERS_DATA_DIR=/mnt/moosefs/flowers-data
INCEPTION_MODEL_DIR=/mnt/moosefs/inception-v3-model

# Path to the downloaded Inception-v3 model.
MODEL_PATH="${INCEPTION_MODEL_DIR}/inception-v3/model.ckpt-157585"

# Directory where to save the checkpoint and events files.
TRAIN_DIR=/mnt/moosefs/flowers/train/

# Run the fine-tuning on the flowers data set starting from the pre-trained
# Imagenet-v3 model.
bazel-bin/inception/flowers_train \
--train_dir="${TRAIN_DIR}" \
--data_dir="${FLOWERS_DATA_DIR}" \
--pretrained_model_checkpoint_path="${MODEL_PATH}" \
--fine_tune=True \
--initial_learning_rate=0.001 \
--input_queue_memory_factor=1
The training should start and you should see a similar output:
2018-08-09 11:30:23.891668: Pre-trained model restored from /mnt/moosefs/inception-v3-model/inception-v3/model.ckpt-157585
2018-08-09 11:31:05.327975: step 0, loss = 2.78 (1.0 examples/sec; 31.969 sec/batch)
2018-08-09 11:31:38.805869: step 10, loss = 2.57 (23.4 examples/sec; 1.370 sec/batch)
2018-08-09 11:31:52.601970: step 20, loss = 2.45 (23.2 examples/sec; 1.376 sec/batch)
2018-08-09 11:32:06.383492: step 30, loss = 2.17 (22.0 examples/sec; 1.452 sec/batch)
2018-08-09 11:32:20.049899: step 40, loss = 2.02 (23.4 examples/sec; 1.367 sec/batch)
2018-08-09 11:32:33.762179: step 50, loss = 1.96 (23.4 examples/sec; 1.370 sec/batch)
2018-08-09 11:32:47.634371: step 60, loss = 1.78 (23.2 examples/sec; 1.382 sec/batch)
Now you can detach from the screen using combination Ctrl+A, Ctrl+D
screen -S flowers_board
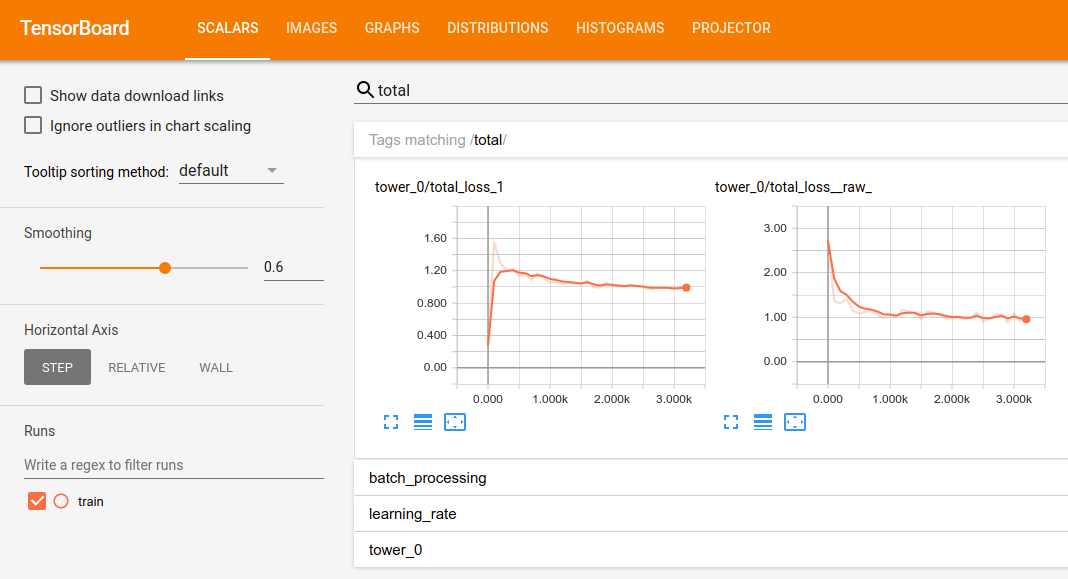
tensorboard --logdir=/mnt/moosefs/flowers --host 0.0.0.0
To reattach to the screen after pressing combination Ctrl+A, Ctrl+D you can use:
screen -r flowers_train
Clone the machine!
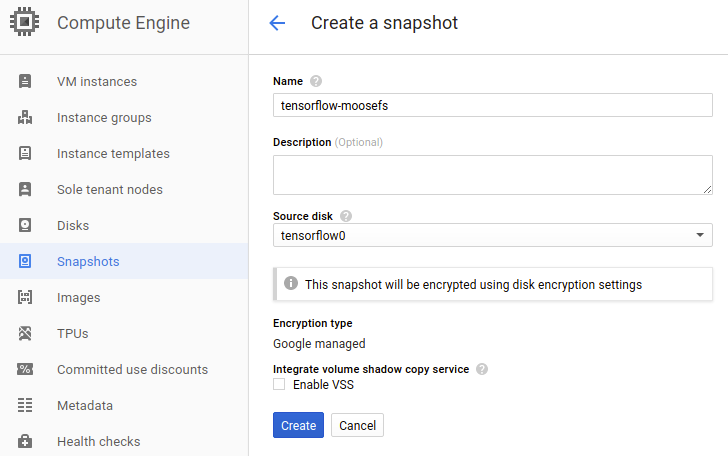
Since we installed everything we can clone tensorflow0 machine. We will create a snapshot of the disk.
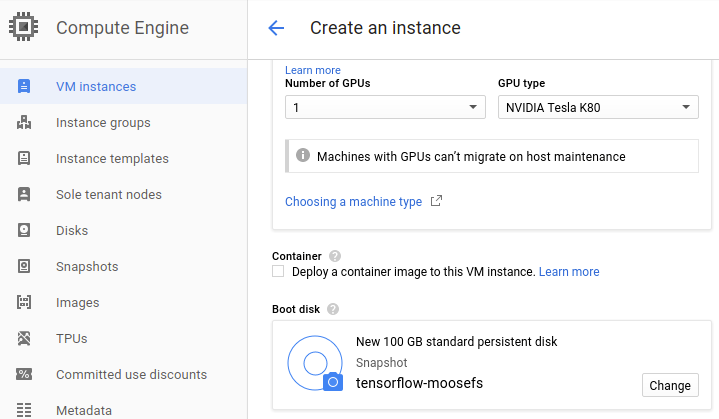
Now we can clone our instance tensorflow0 and use the snapshot as a disk.

Start tensorflow1 machine and mount MooseFS
sudo mfsmount /mnt/moosefs
Then run the following commands:
screen -S flowers_eval

cd ~/tensorflow/models/research/inception
FLOWERS_DATA_DIR=/mnt/moosefs/flowers-data
INCEPTION_MODEL_DIR=/mnt/moosefs/inception-v3-model

# Path to the downloaded Inception-v3 model.
MODEL_PATH="${INCEPTION_MODEL_DIR}/inception-v3/model.ckpt-157585"

# Directory where to save the checkpoint and events files.
TRAIN_DIR=/mnt/moosefs/flowers/train/

# Directory where to save the evaluation events files.
EVAL_DIR=/mnt/moosefs/flowers/eval/

# Evaluate the fine-tuned model on a hold-out of the flower data set.
bazel-bin/inception/flowers_eval \
  --eval_dir="${EVAL_DIR}" \
  --data_dir="${FLOWERS_DATA_DIR}" \
  --subset=validation \
  --num_examples=500 \
  --checkpoint_dir="${TRAIN_DIR}" \
  --input_queue_memory_factor=1
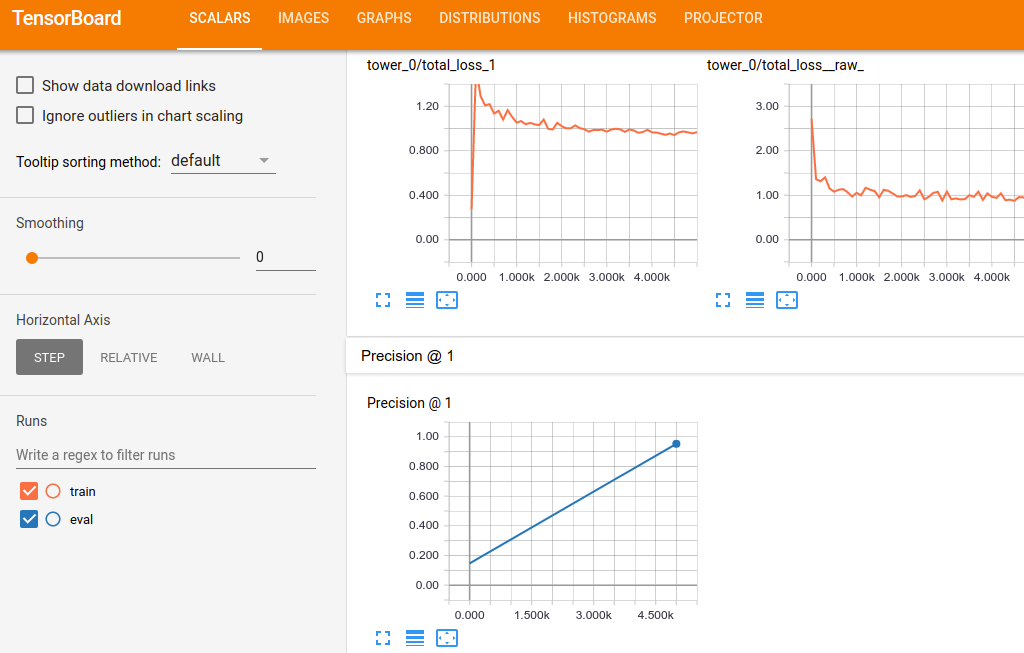
After a moment the evaluation result should be ready in Tensorboard
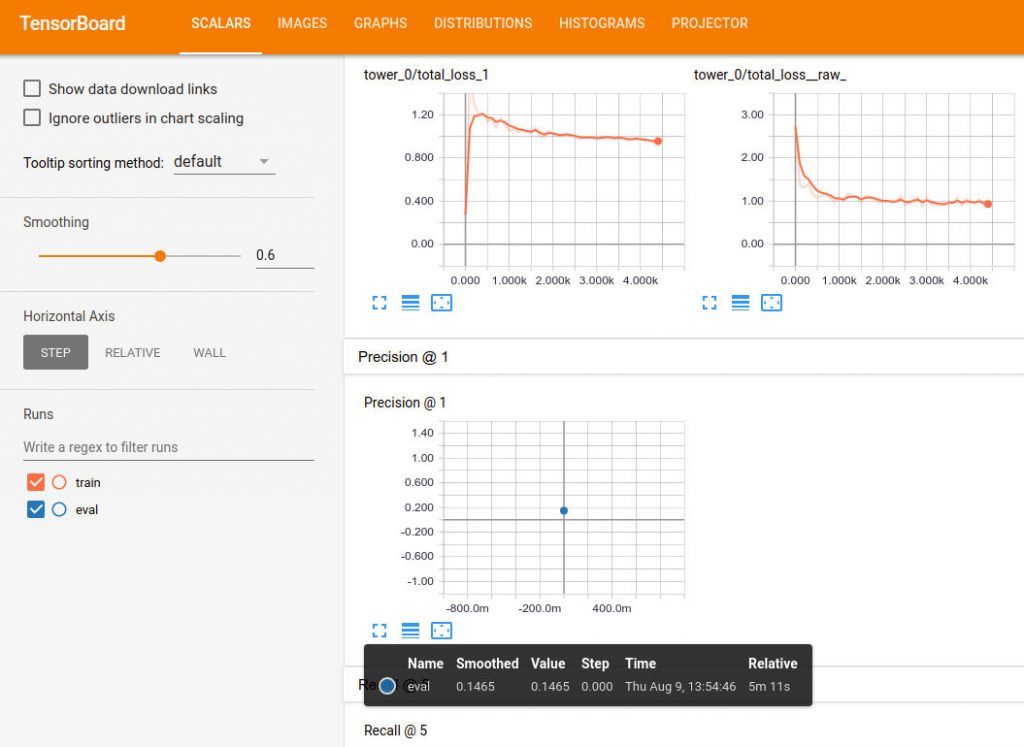
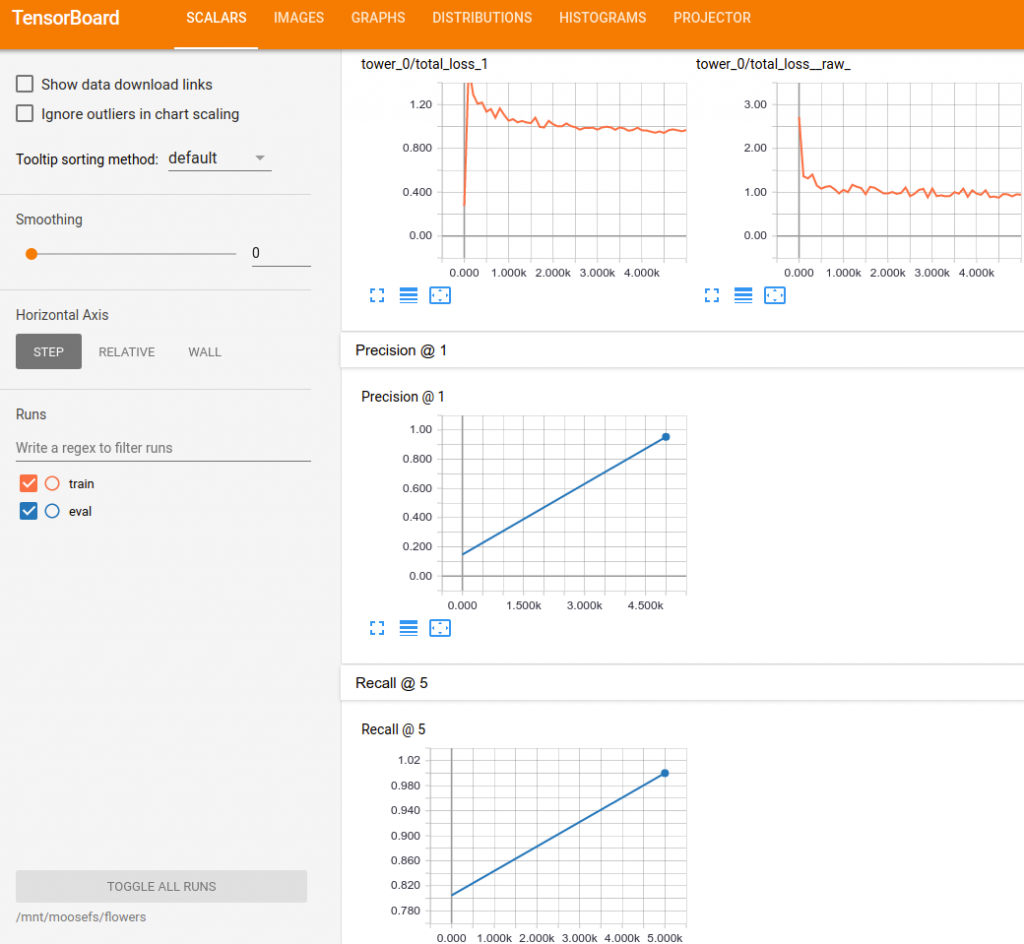
Model is saved every 5000 steps and evaluation code is looking for a new checkpoint every 5 minutes. After 2 hours of training your Tensorboard should look similar to this:
Summary
In this post, you have learned how to use MooseFS with Tensorflow to start evaluation on the other host and evaluate the model while training. Tensorflow is writing logs and saving models to MooseFS storage, so all of the files are available on both machines.
You can also run another training simultanously and get more results with different parameters faster!
